We do offer an interactive user dashboard, provided by the amazing WooCommerce, which is the top leading WordPress plugin for eCommerce. By default, it comes with user account section where users can check their orders, addresses, reset password and more.
How to create the user dashboard page?
Navigate to your admin dashboard, then go to Pages Add New, and create a new blank page, name it properly and insert the following shortcode in the post content: [woocommerce_my_account]
Then, it is recommendable to go to Settings Permalink and click the Save Changes button in order to flush your endpoints.
Now, that you have the my account page, if you visit it on the front-page, you should see your personal information and additional section that will allow you to track your activity and take multiple actions.
Some of the important sections that we are injecting to WooCommerce account page are as following:
- Listings
- Entries
- Messages
- Payouts
- Notifications
Listings
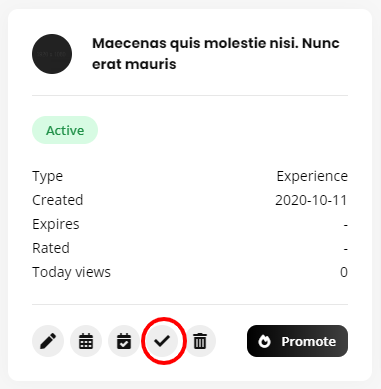
In this section, you can manage all your active listings. The box will display some basic information for the listing. You should also be able to see an edit icon that allows you to make any changes.
Please note, that if you enable the option General Submission Requires admin approval after update for your listing type, if you make any changes to your listings, its status will be changes to pending, until approved by an administrator.
Entries
The entry is a WordPress custom post type that will appear in your admin area under Listing Types Entries. It represents any action that was taken, like a purchase or application.
These entries will also appear in the user dashboard, under Entries, so everyone can keep a track on his actions.
Different entry types may have different layout and styling and output information.
Also, please note that not all the action types generate entries, like the contact action type. This kind of action type will trigger our chat system and create a conversation that you can track in the Messages section.
Notifications
You, as the site owner, can enable multiple notifications through the notification settings. But the end user can decide to receive these notifications or not. All the active notifications will appear in this section.
Payouts
The end user will generate income, based on your actions types, fees and more criteria. Everyone can keep a track on his earnings by going to the main user dashboard or the payouts section.
The site owner can enable the user payouts by going to Listing Types Settings General Payouts, and check the option Enable payouts. In this same section, you can find the available payout methods, which are PayPal and Direct bank transfer.
Once, enabled, the users can request a payout when they decide. These payout requests will appear in your admin dashboard, under Listing Types Payouts. The payout request must be handled by the site owner manually, then it can be marked as processed and the funds will be deducted from the customer’s earnings.
Learn more about managing user earnings from your back-end.
Other helpful articles you should consider reading
Ability to disable listings from the account dashboard.
You can hide and show your listings from the tick button shown below in the image. After clicking on the button, a popup will appear and will confirm a box to hide the listing and after that it will be successfully live.You will see a cross button in the place of tick button to hide the respective listing.